Scatter Sky
Torque 3D includes an object called a Scatter Sky which uses a dynamic sky coloring system to create more vibrant varying skies than the simple Skybox object.
As the name implies, the Scatter Sky object produces the sky. Additionally, it includes level lighting, sun positioning, and a hook for time of day manipulation. This can be used for a fully functioning day/night system.
Adding a Scatter Sky
Every new mission starts with both Sky Box and Sun objects. Since the Scatter Sky object contains the functionality of those two objects embedded within it they must be removed in order to use a Scatter Sky in the level.
To create a new Scatter Sky, change to the Library tab in the Scene Tree panel. Click on the Level tab and select the Level folder. Locate the Scatter Sky entry and double-click it.

The Create Object dialog will appear. The Object Name is what you want your Scatter Sky to be named. It will appear in the Mission Group of the Scene Tree. Enter theSky as the name, leave the rest of the values at their defaults, then click Create New.
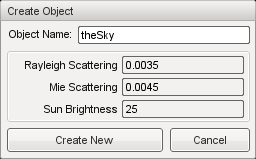
A new Scatter Sky object will be created and automatically added to your level. Therefore, it will once again have a sky. Since the Scatter Sky supplies a sun, the level should now be lit.
Scatter Sky Properties
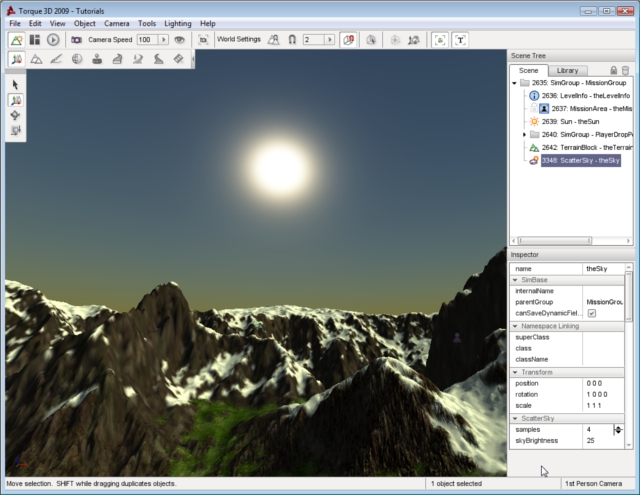
Additional properties can be changed with the Inspector pane. To change the Scatter Sky properties using the Inspector Pane, click the Scene tab. Then click the name of your new Scatter Sky object. The Inspector pane will update to display the current properties of your new Scatter Sky.
Inspector
- name
- TypeName. Optional global name of this object.
- id
- TypeCaseString. SimObjectId of this object. Read Only.
- Source Class
- TypeCaseString. Source code class of this object. Read Only.
Transform
- position
- MatrixPosition. Object world position.
- rotation
- MatrixOrientation. Object world orientation.
- scale
- Point3F. Object world scale.
Scatter Sky
- skyBrightness
- TypeF32. Global brightness and intensity applied to the sky and objects in the level.
- sunSize
- TypeF32. Affects the size of the sun’s disc.
- colorizeAmount
- TypeF32. Controls how much the the alpha component of colorize brigthens the sky. Setting to 0 returns default behavior.
- colorize
- TypeColorF. Tints the sky the color specified, the alpha controls the brigthness. The brightness is multipled by the value of colorizeAmount.
- rayleighScattering
- TypeF32. Controls how blue the atmosphere is during the day.
- sunScale
- TypeColorF. The color shading applied to objects in direct sun light.
- ambientScale
- TypeColorF. The color shading applied to objects not in direct sun light, such as in the shadows.
- fogScale
- TypeColorF. Modulates the fog color. Note that this overrides the LevelInfo.fogColor property, so you should not use LevelInfo.fogColor if the level contains a ScatterSky object.
- exposure
- TypeF32. Controls the contrast of the sky and sun.
Orbit
- azimuth
- TypeF32. The horizontal angle of the sun measured clockwise from the positive Y world axis.
- elevation
- TypeF32. The elevation angle of the sun above or below the horizon.
- moonAzimuth
- TypeF32. The horizontal angle of the moon measured clockwise from the positive Y world axis.
- moonElevation
- TypeF32. The elevation angle of the moon above or below the horizon.
Lighting
- castShadows
- TypeBool. Enables/disables shadows cast by objects due to Sun light.
- brightness
- TypeF32. Adjust the global Sun contrast/intensity.
Misc
- flareType
- TypeLightFlareDataPtr. Datablock for the flare and corona produced by the Sun.
- flareScale
- TypeF32. Changes the size and intensity of the flare.
Night
- nightColor
- TypeColorF. The ambient color during night. Also used for the sky color if useNightCubemap is false.
- nightFogColor
- TypeColorF. Color shading of fog present during night scenes.
- moonEnabled
- TypeBool. Toggles rendering of moon image during night.
- moonMat
- TypeMaterialName. Material for the moon sprite.
- moonScale
- TypeF32. Controls size the moon sprite renders, specified as a fractional amount of the screen height.
- moonLightColor
- TypeColorF. Color of light cast by the directional light during night.
- useNightCubemap
- TypeBool. Toggles rendering of star cubemap during night scenes, similar to Sky Box.
- nightCubemap
- TypeCubemapName. Cube map used to render stars in the sky during night scene.
Advanced Lighting
- attenuationRatio
- TypePoint3F. The proportions of constant, linear, and quadratic attenuation to use for the falloff for point and spot lights.
- shadowType
- TypeEnum. The type of shadow to use on this light.
- cookie
- TypeStringFilename. A custom pattern texture which is projected from the light.
- texSize
- TypeS32. The texture size of the shadow map.
- overDarkFactor
- TypePoint4F. The ESM shadow darkening factor.
- shadowDistance
- TypeF32. The distance from the camera to extend the PSSM shadow.
- shadowSoftness
- TypeF32. Adjusts shadow edge clarity.
- numSplits
- TypeF32. The logrithmic PSSM split distance factor.
- logWeight
- TypeF32. The logrithmic PSSM split distance factor.
- fadeStartDistance
- TypeF32. Start fading shadows out at this distance. 0 equates to auto calculate this distance.
- lastSplitTerrainOnly
- TypeBool. This toggles only terrain being rendered to the last split of a PSSM shadow map.
Advanced Lighting Lightmap
- representedInLightmap
- TypeBool. This light is represented in lightmaps (static light, default: false).
- shadowDarkenColor
- TypeColorF. The color that should be used to multiply-blend dynamic shadows onto lightmapped geometry (ignored if representedInLightmap is false).
- includeLightmappedGeometryInShadow
- TypeBool. This light should render lightmapped geometry during its shadow-map update (ignored if representedInLightmap is false).
Modifying Brightness
Remember to refer back to the properties as you proceed through the rest of this guide. It is time to modify some of the more important fields of the current ScatterSky object. After each change is demonstrated, you will be reverting back to the stock values to show how these modifications affect the object.
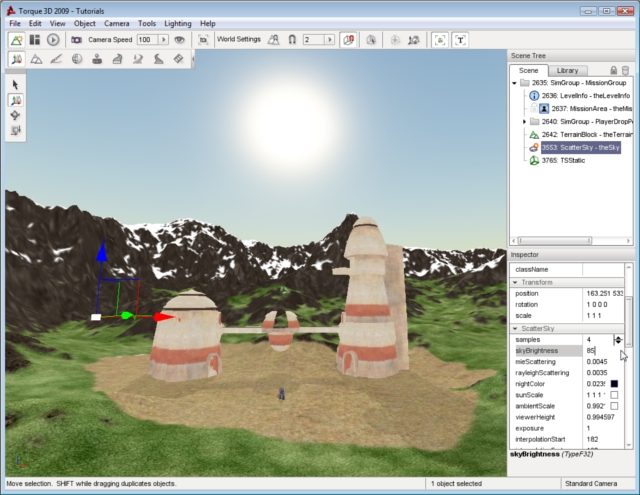
Now will start with adjusting the brightness of the sky and atmosphere. Under the ScatterSky section of the properties, look for the skyBrightness field. The default value is 25.
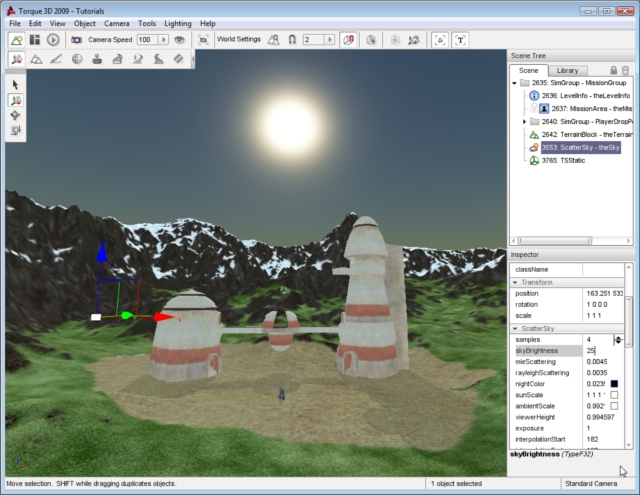
The skyBrightness field acts a global modifier of your brightness in the scene. Changing this value is similar to adjusting the contrast of a camera or monitor. Reduce the value to 5. This reduction will dramatically change the appearance of your level.

Now, greatly increase the value of skyBrightness to around 85. The view of your level should be extremely bright, as if the scene takes place in a desert at high noon.
If you have not already done so, revert your default brightness back to 25. You should change each value back to the default in this manner between each section of the remaining guide to see the effects of the next property.
Modifying Scattering
The scientific concept of scattering and how it affects your level is somewhat complex. The rayleighScattering and mieScattering values are extremely sensitive, and it is important that you have an understanding of how they work. The simplest way to explain scattering is to answer a question children often ask: “Why is the sky blue?”
In reality, beyond the atmosphere of the sky is blank space, that is, blackness. When you look up at the night sky, you can see the black of space and the stars it contains. However, during the day you see a blue sky. The blue color is due to the light rays from the sun being scattered by the molecules of the atmosphere as it passes through. Light appears to be white but it is actually composed of many different colors. The sky is usually blue because blue light scatters more easily than the other colors due to its physical properties.
The sky at the zenith is a darker blue than the sky near the horizon for two reasons. First, the atmosphere at this altitude is composed of much smaller particles, which is only capable of scattering the darker shades of blue light. Second, the light has had less opportunity to be scattered since it has not passed through as much atmosphere yet. The more times the same light is scattered, the paler the blue will become.
However, blue is not the only color that is scattered by the atmosphere, it is just the most common. Other colors, such as the reds at sunset, are due to how much atmosphere the light has passed through to get to your eyes. In this case, reds and blues are both being scattered but blue has been dissipated so much that it is no longer visible. The result is a red sky.
The scientific term for this light scattering effect is called Rayleigh Scattering, thus the rayleighScattering property of Torque 3D controls the color and darkness of the ScatterSky object.
The size and composition of particles in the atmosphere, such as dust and water, also has an effect on how light appears. Larger particles tend to scatter all colors of light approximately the same. This effect makes clouds, which are made of water vapour, appear to be white or grey. This is because the colors of the light are being scattered the same so that what you see resembles the original white form.
This type of scattering is also responsible for the clarity of a bright object and how the light rays are projected from it. The scientific term for this type of scattering is Mie Scattering, thus the mieScattering property of Torque 3D controls the clarity of light from bright objects such as the sun.
In summary, the scattering properties in Torque 3D are used to emulate the affects of nature. The mieScattering property affects the appearance of how light waves are projected from the sun object and the rayleighScattering property affects the color of the sky including how blue it will be.
Proceed to see the adjustment of these properties in action. Reduce the mieScattering field to a small value, such as 0.0005. You should notice that the scattering of the light around the sun object has been drastically reduced, resulting in a smaller and smoother sun.

Reset the mieScattering back to the default value (approximately 0.0045). Lower the rayleighScattering field to 0.0006.
The atmosphere of the sky should now be a darker shade of blue. Reducing the rayleighScattering value simulates two things. First, it simulates an atmosphere which reduces the colors of light that will be scattered limiting it to the darker blues. Second, it simulates an atmosphere that has had less opportunity to dissipate the light leaving the darker shade of blue intact:
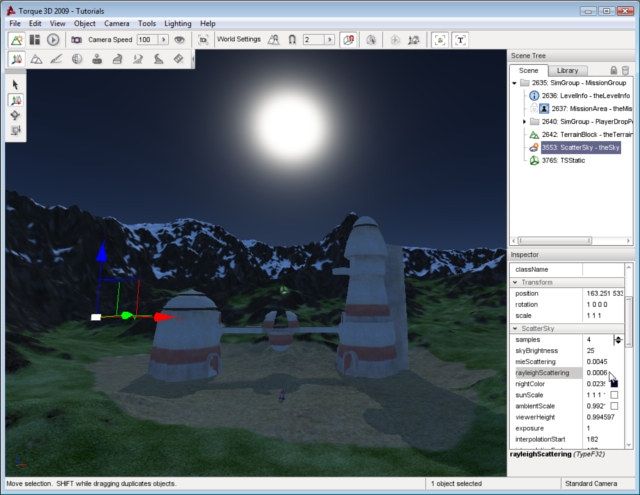
At some point, you can reduce the value only so far before you hit a shade of blue that is almost completely black. This does not mean you are actually seeing the black of space, rather you are seeing the darkest shade of blue light which has not been dissipated at all.
Go in the opposite direction. Begin increasing the rayleighScattering until you hit a value of 0.008. This simulates two things. First, it simulates an atmosphere which allows more colors of light to be scattered. Second, it simulates an atmosphere that has had less opportunity to dissipate the light leaving paler shades of the light. The result in your level is a broader range of colors in your sky.
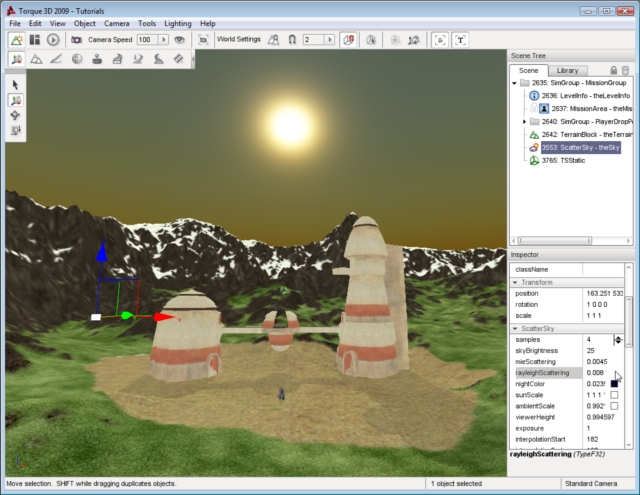
If you go too high with the value, your sky will eventually become black. This is due to the allowance of all wave lengths to interact with the atmosphere. The effect is known as the subtractive rule of colors: white is the complete lack of color (light interaction) and black is the presence of all colors. In other words, the atmosphere is absorbing all colors so you see black.
If you have become confused, there are quite a few resources in your local library and on the Internet you can look up to learn more. If you have gotten this far, but wish to keep it simple, remember the following:
- mieScattering
- Higher equals bigger and more scattered Sun. Lower equals smaller, smoother Sun.
- rayleighScattering
- Higher equals less blue sky. Too high equals black sky. Lower equals more blue sky. Too low equals black sky.
Modifying Colors
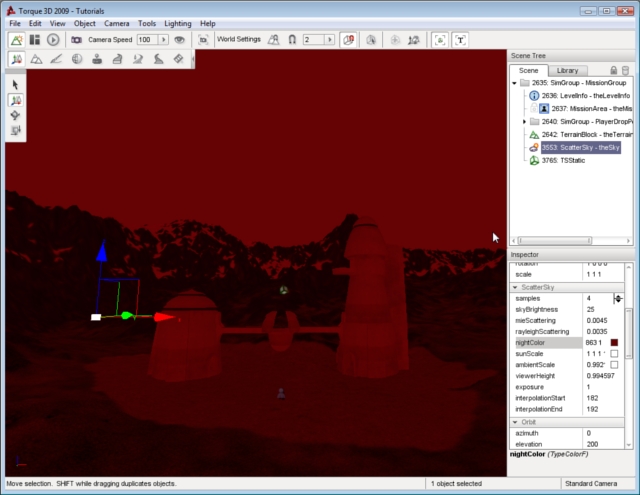
Move on to simpler concepts and property adjustments. The nightColor is a conditional property, as it only affects the scene during certain lighting conditions. As explained in the Sun documentation, modifying the azimuth and elevation will change the “time of day” for your level.
Go ahead and set the Elevation property in the Orbit section to 200, which will place the sun below the horizon. When the sun is no longer shining on your level, it is night time.
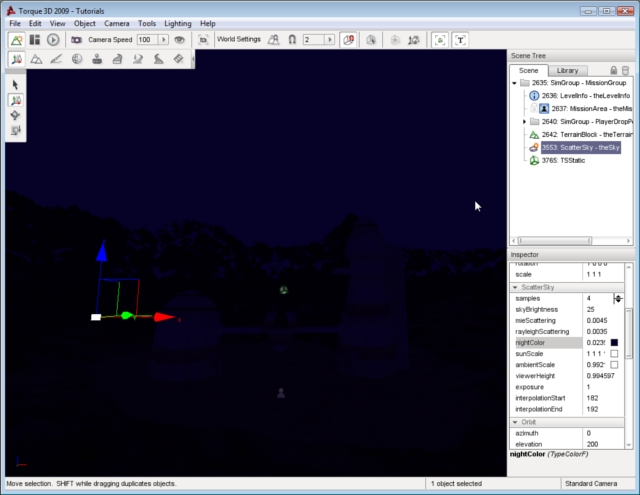
Scroll to the Night section in the Inspector Pane. Instead of manually guessing color values, click on the colored box next to the nightColor property. This action will open the Color Picker dialog. The dialog allows you to visually adjust the shade of your night time color. For an intense effect, go with an unnatural color such as red.
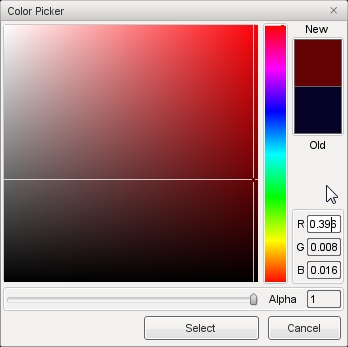
Click the select button when you are ready. Your level should immediately reflect the nightColor change you have made. Very creepy...
Definitely change the value back to something more suitable, such as deep blue/black color. Change the Elevation property in the Orbit section back to a number between 0 and 90 such as 45 to bring the sun back above the horizon and relight your scene.
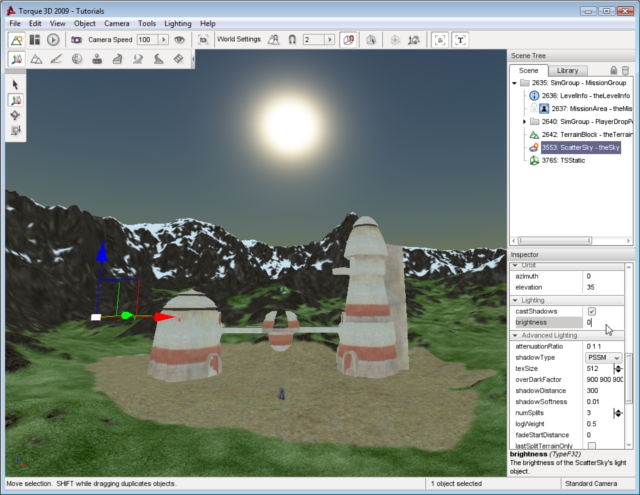
Modifying Shadows and Light Intensity
There are two fields under the Lighting section that strongly influence how your scene appears. The first property, castShadows, can be toggled on or off. Clicking on the property to toggle it off will result in a blank box. With castShadows disabled, nothing in your scene will cast a shadow: objects, terrain, etc.
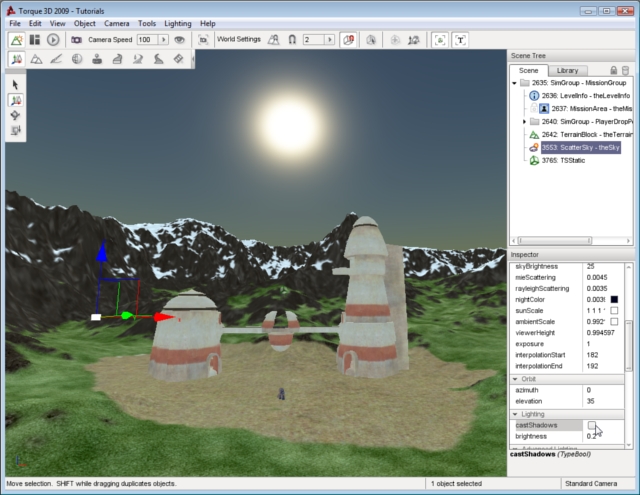
You can re-enable the shadows in your scene by clicking the box again, which will produce a check mark informing you that it has been enabled.
If you are using Advanced Lighting, the objects in your level will immediately begin casting shadows. If you are using Basic Lighting, you will need to relight the scene. Either way, the shadows will update according to the position of the sun.

The brightness field under the Lighting section is completely separate from the skyBrightness property in the ScatterSky section. Unlike skyBrightness, which changes the contrast of your entire scene (particularly the sky itself), the brightness property under Lighting directly affects your objects in the scene.
You can see how this property functions by adjusting the value. Increase the brightness to 1. The lighting in your scene should be much brighter. Additionally, the shadows in your scene will be much darker and more defined.
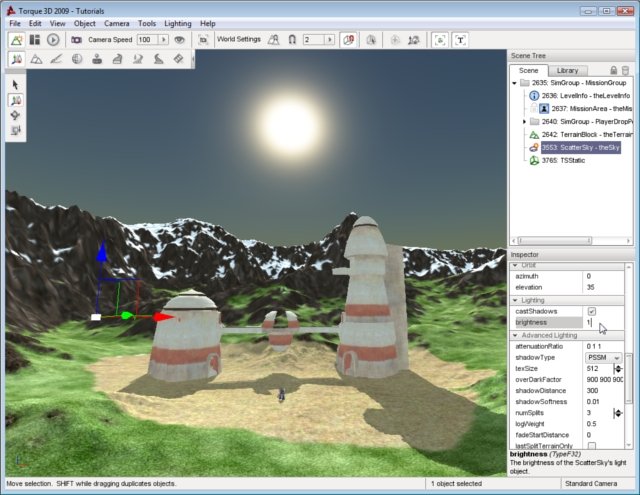
Notice how your atmosphere (sky and sun) did not change. Every other object in your scene should be better lit. You can remove the additional brightness by setting the value of the property to 0. The result is the additional, global brightness factor has been completely removed. Your lighting should now be minimal, and your shadows nearly invisible.