Particle Editor
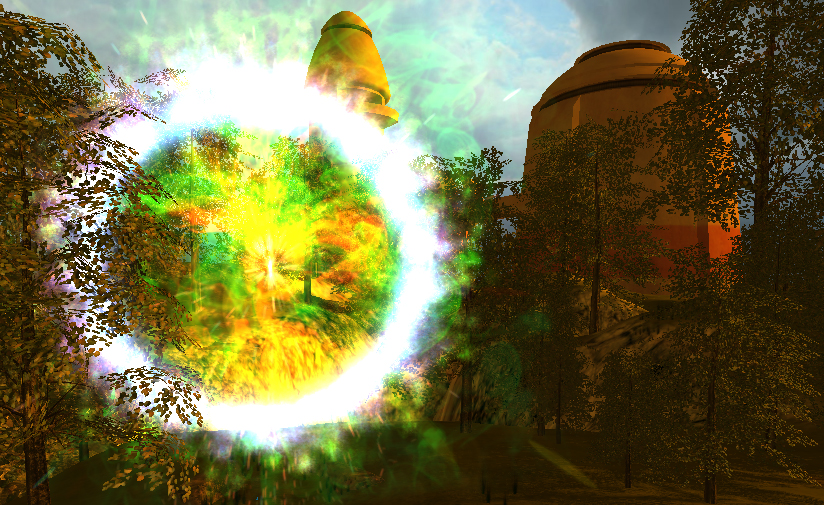
Torque 3D provides a full featured particle system with many parameters which can be manipulated to fine tune your particle effects. Particle effects are things such as fire balls, smoke, and water splashes that you create and place into your levels. The Torque 3D Particle Editor is the tool of choice for full control over the look and feel of your effects. At its most basic level a particle effect consists of: an emitter, a particle to be emitted from the emitter, and an image rendered to represent that particle.
The emitter controls: the creation of the particles; their movement; which directions the particles will travel, also referred to as the spread pattern and: how each particle blends into the world.
The particle controls its own life span, what image will be shown; how big the image is; what it’s color over time is; and some basic force settings.
Interface
The Particle Editor can be activated from the dmain menu by selecting Editors -> Particle Editor. Or alternately, click the Particle Icon from the Tool Selector bar.Whenever the Particle Editor is active the Particle Editor – Emitters pane will be present on the right side of the screen. This pane is further divided into two tabs:
- The Emitter tab contains properties about the currently selected emitter
- The Particles tab contains properties about the currently selected particle.
Select either the Emitter tab or particle tab depending upon which object you wish to work with. In adition to the tabs there are also two buttons within the header of the Particle Editor.
One Shot Effect Types
There are two types of particle effect:
- continuous effects, which constantly emit particles
- one-shot effects, which only produce particles for a short time and then stop
Continuous effects run constantly so your changes can be seen in real-time as you adjust the properties of the emitter and its particles. In order to see your changes for one-shot emitters you need to replay the emission. To replay a one-shot emitter click the arrow icon to the right of the tabs.
The Temporary Emitter
When you open the Particle Editor you may have noticed it creates a temporary particle emitter in your current view. This temporary emitter is very useful for quickly trying out different particle editor settings.If your view is changed and you no longer see temporary emitter, press the little camera icon to the right of the tabs to place it back into view. It will always be placed in the center of your current view. The temporary particle emitter can be moved, rotated, and scaled like any other shape using the Object Editor.
New Emitter / Particle
To create a new blank emitter or particle that is ready to be configured, press the new icon on the Emitter or Particle tab as appropriate.
Save Emitter / Particle
After editing an emitter or particle save the new settings by pressing the save icon on the Emitter or Particle tab as appropriate. Particle emitters are updated in real-time. Any changes to a particle or emitter will be reflected through out your level when changes are saved. Any instances of the emitter or particle that you are editing will also be changed. As with a lot of Torque 3D Editors the Particle Editor writes the resulting data to script files which the engine runs to create the particle emitter when you game is being played.
- Emitters can be found in a file named: projectName/game/art/levels/levelName.mis
- Particles can be found in a file named: projectName/game/art/shapes/particles/managedParticleData.cs
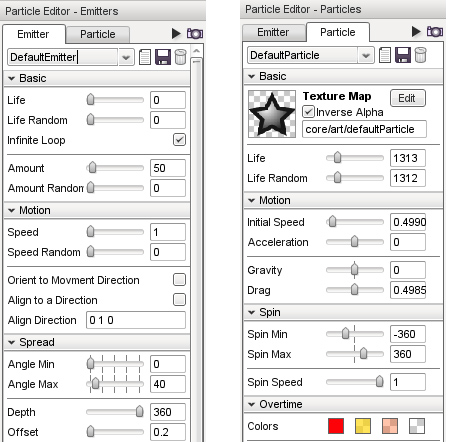
Emitter Properties
The Emitter tab contains the properties that define an Emitter. Properties are grouped into sections:
Basic
Basic properties affect the base emitter:
- Life
- The time duration in ms that the effect will emit particles.
- Life (Random)
- Substitutes a random value for the life property.
- Infinite Loop
- When enabled this emitter will continuously produce particles. This setting effectively causes the Life and Random Life properties to have no affect on the emitter.
- Amount
- The time in ms between each individual particle released from the emitter.
- Amount Random
- Random Variation amount to be applied to the amount setting.
Motion
These settings will affect the emitter spread pattern, speed, and particle image orientation:
- Speed
- The velocity the particle will leave the emitter in the defined spread pattern.
- Speed Random
- A random setting for varying the speed.
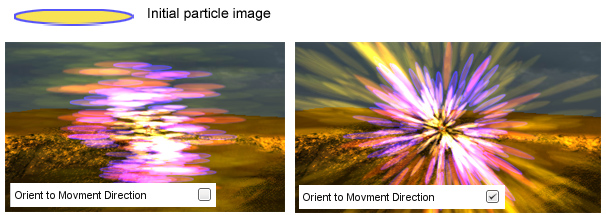
- Orient to Movement Direction
- Enabling this option fixes the particles image to the velocity direction of the particle. Note this will over ride any particle spin settings.
- Align to a Direction
- Enabling this option aligns the particles to a predefined vector set up in Align Direction option.
- Align Direction
- The vector used for particle alignment if the Align to a Direction option is checked.
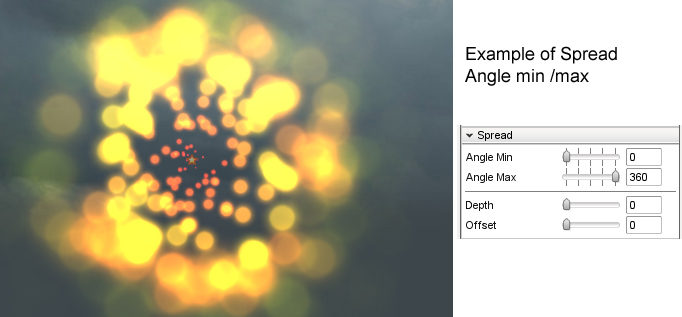
Spread
These setting affect how the spread pattern will be dispersed:
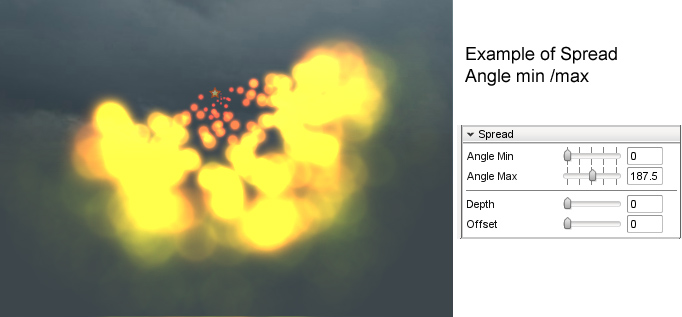
- Angle Min
- The minimum angle for the emitter spread pattern.
- Angle Max
- The maximum angle for the emitter spread pattern.
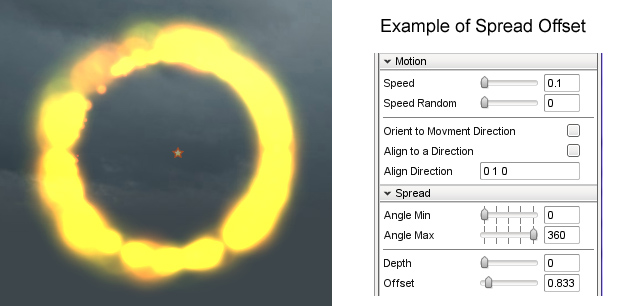
- Depth
- The depth of the released pattern. A setting of 360 will create a spherical spread pattern when Angle Max is set to 360.
- Offset
- The distance from the emitter that particles will be released. Effectively the distance that the particle will be visible to the viewer.
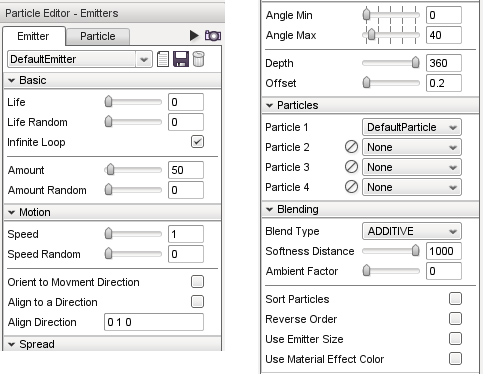
Particles
This affect assigns which particle(s) will be emitted from this emitter:
- Particle 1 - 4
- Select the particle from the drop down list to be used with this emitter. If at any time you need to remove a particle press the clear icon. Particle 1 can not be removed.
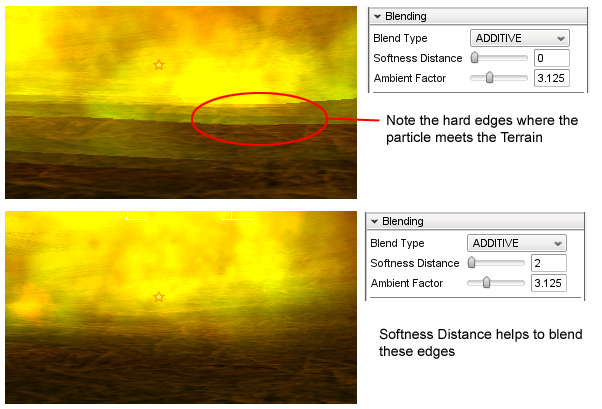
Blending
These setting affect how the particle(s) are rendered.
- Blend Type
- The types of blending available to be applied to the particles.
- Softness Distance
- The particle edge blending distance. Removes the hard edges where the particle meets an object.
- Ambient Factor
- Adjusts the alpha blend (level of the particles which affects how transparent they are).
- Sort Particles
- The order in which particles are rendered.
- Reverse Order
- When enabled, reverses the render order set in the Sort Particles setting
Particle Properties
The Particle tab contains the properties that define a Particle. Properties are grouped into sections:
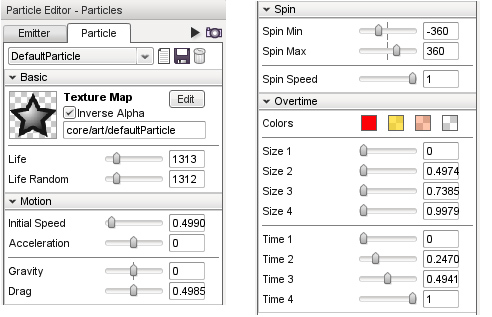
Basic
Particle basic settings.
- Texture Map
- The image that will be used on the emitted particle. The Edit button will open a file browser to locate and select a particle image.
- Inverse Alpha
- Invert the alpha channel on the partice image (if one exists).
- Life
- The time in ms (milliseconds) after its creation that the particle will exist for.
- Life Random
- Random variation to the particle life span.
Motion
These settings affect the velocity of the particle.
- Initial Speed
- The initial velocity, that the particle will travel at after being emitted. (Not to be confused with emitter spread speed.)
- Acceleration
- The rate at which the particle’s velocity with increase or decrease. Positive values cause a particle to speed up over time after being emitted. Negative values cause a particle to slow down over time after being emitted.
- Gravity
- The gravitational force to be applied to particle. Positive values cause the particle to fall to the ground. Negative values cause the particle to rise from the ground.
- Drag
- The amount of force working against the particle velocity. Drag will slow a particle’s movement.
Spin
These settings affect if, and how, a particle rotates in degrees.
- Spin Min
- The minimum rotation to be applied to the particle.
- Spin Max
- The maximum rotation to be applied to the particle.
- Spin Speed
- The speed of particle’s rotation.
Overtime
These settings affect the particle based upon how long it has been in existence for. Each particle can have up to four color and size settings, which can be set to change over time.
- Colors
- Four color swatches indicate the color phases which a particle can pass through. To set any color click that swatch. To set a color value you may: enter R (red), G (green), and B (blue) color values; click anywhere within the gradient on the left or; click anywhere in the vertical “rainbow” strip. Red, green and blue color values range from 0 to 255 and indicate the amount of that color present in the overall particle color. The alpha value which represents the transparency of the particle color can be set by entering a decimal number between 0.0 and 1.0 in the Alpha field or by moving the slider with the mouse. The higher the number the less transparent the color will be.
- Size 1-4
- Each slider sets the size for the particle during each time stage.
- Time 1-4
- Each slider sets the time for that stage.